Mastering Cosmetic Packaging: A Comprehensive Guide to Die-Cut Templates and 3D Previews
In the highly competitive world of beauty and personal care, first impressions are everything. The moment a customer picks up a cosmetic product, their perception of quality, luxury, and brand identity is formed before they even open the container. This is why cosmetics packaging box die cut design is not merely an aesthetic choice but a critical strategic component of modern marketing. For designers, entrepreneurs, and small business owners, navigating the technical aspects of packaging production can seem daunting. However, with the right digital tools—specifically pre-prepared die-cut templates with 3D previews—creating professional-grade packaging has become more accessible than ever.
This article explores the intricacies of packaging design, the importance of accurate die-line specifications, and how utilizing high-quality digital templates can streamline your creative workflow while ensuring your products look stunning on the shelf or in unboxing videos.
Understanding the Anatomy of a Die-Cut Box
To create effective packaging, one must first understand what lies beneath the surface design. A "die line" or "dieline" is the flat layout that dictates where the cardboard will be folded, glued, and cut to form a three-dimensional box. Without precise dimensions, even the most beautiful graphic design can result in a package that fails to close properly or lacks structural integrity.
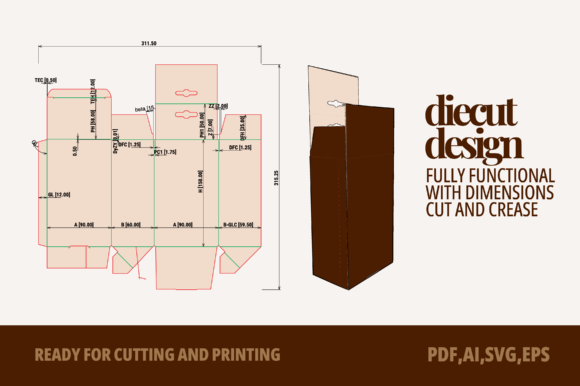
When we discuss cosmetics packaging box die cut design, we are referring to the blueprint that manufacturers use. This blueprint includes:
- Cut Lines: These indicate exactly where the material needs to be sliced to separate the shape from the surrounding sheet.
- Crease Lines: Also known as fold lines, these guide the machine (or manual press) on where to bend the material to create sharp, clean corners and edges.
- Gaps and Glue Flaps: Small sections left unprinted or specifically marked for adhesive application, ensuring the box stays securely shut during shipping and handling.
For beginners, it is a common misconception that you can simply draw a rectangle and ask a printer to "fold it." In reality, variations in paper thickness, glue absorption, and mechanical tolerance mean that every millimeter counts. This is why using a template organized with cut, crease, model, and dimensions is essential for achieving a professional finish.
The Power of 3D Previews in Digital Design
One of the most significant advancements in packaging design software is the integration of 3D Preview capabilities. Historically, designers had to rely on imagination or expensive physical prototypes to visualize how a flat dieline would transform into a tangible object. Today, thanks to advanced vector software and template structures, you can see exactly how your design will look when assembled.
A Cosmetics Packaging Box Die cut Template with 3D Preview allows you to:
- Visualize Proportions: See if your logo placement looks balanced on the front panel versus the side.
- Check Bleed Areas: Ensure that background colors extend far enough beyond the cut line to prevent white edges after trimming.
- Identify Interference: Spot areas where text or graphics might end up on a glue flap or inside a fold, which would ruin the final aesthetic.
This technology bridges the gap between digital creativity and physical manufacturing. It reduces the risk of costly errors, such as ordering hundreds of boxes only to find that the design wraps awkwardly around the corner. By working with files that include real dimensions, you gain confidence that your digital creation will translate seamlessly into the physical world.
Why Pre-Prepared Templates Are Essential for Efficiency
Many aspiring brand owners attempt to create their own dielines from scratch. While this offers total control, it requires extensive knowledge of printing tolerances and material properties. This is where purchasing or downloading pre-prepared files with real dimensions becomes invaluable. These templates are engineered by professionals who understand the mechanics of die-cutting machines.
Using a ready-made template offers several distinct advantages:
1. Accuracy and Precision
The files included in our package are ready for cutting on the die cutting machine. They are not rough sketches; they are mathematically precise layouts. Whether you are producing a small lipstick tube box or a larger foundation carton, the dimensions are calibrated to ensure a snug fit for your specific product size.
2. Flexibility Through Resizing
While the files come with standard industry dimensions, they are fully editable. You can resize them of course to fit your needs. If your cosmetic jar is slightly taller than the default template, you can adjust the height parameters without breaking the structural logic of the folds. This flexibility ensures that the template serves as a robust starting point rather than a rigid constraint.
3. Streamlined Workflow
Time is money in the startup phase. Instead of spending days researching box styles and calculating measurements, you can focus on what matters most: your brand identity. With the structure already built, you can dive straight into the creative process.
Technical Specifications and File Formats
To accommodate different stages of the design process, this digital product provides versatility through multiple file formats. When you purchase this template, you receive a single zip file containing four essential formats, each serving a specific purpose in the design pipeline.
You will get all what you see in pictures, ensuring transparency and accuracy. The contents of the download include:
- EPS10: An excellent format for compatibility with various Adobe applications and other vector software. It preserves layers and effects, making it ideal for intermediate editing.
- SVG: Scalable Vector Graphics are perfect for web-based design tools and laser cutters. If you plan to do prototyping at home with a Cricut or Silhouette machine, this format is crucial.
- PDF: Portable Document Format is widely used for sharing designs with clients or printers. It ensures that fonts and vector paths remain intact regardless of the device used to view it.
- AI: The native Adobe Illustrator file. This is the most powerful format for professional designers, offering full access to editable paths, swatches, and layer structures.
Note on Software: To access these files, you will need to unzip the archive. You can use free software like WinRAR or WinZip to extract the contents easily. Once extracted, you can open the AI or EPS files in Adobe Illustrator, Affinity Designer, or similar vector programs.
How to Use Your Template: A Step-by-Step Approach
Creating your unique design is straightforward once you have the template loaded. Here is a simple workflow to ensure your final output is print-ready:
Step 1: Organize Your Layers
Open the template in your preferred vector software. You will notice distinct layers for cuts, creases, and the base model. It is best practice to keep these structural elements on locked, non-printing layers so they do not interfere with your artwork.
Step 2: Create Your Design
Start a new layer above the structural guides. Here, you can place your logos, illustrations, typography, and color blocks. Remember to account for bleed—extending your background colors about 3mm past the cut line to avoid white borders after trimming.
Step 3: Check Your 3D Preview
If your software supports it, utilize the 3D preview feature to rotate the box. Look closely at the seams and corners. Does the pattern align? Is any important text hidden behind a fold? Adjust your design as needed.
Step 4: Export and Print
Once satisfied, flatten your design layers (keeping the dieline visible for reference) and export as a high-resolution PDF. Send this file to your printer along with the original dieline if requested, or use the provided SVG/EPS files if you are cutting locally.
Important Considerations for Buyers
As you embark on your packaging journey, it is vital to clarify the nature of this product to manage expectations correctly.
Digital Product Only: Please note that this is a digital product No physical item will be sent or mailed. You are purchasing the intellectual property and the digital files necessary to create your packaging. There is no cardboard box shipped to your address.
Color Accuracy: Designs created on screens use RGB color models, while printed materials use CMYK or Pantone ink. Always convert your files to CMYK before sending them to a professional printer to ensure color consistency. Screens often display brighter, more saturated colors than physical ink can reproduce.
Material Variance: While the dimensions are precise, the final feel of the box depends on the material you choose. Corrugated cardboard will behave differently than rigid board or matte-finish cardstock. Always order a physical sample from your manufacturer before committing to a large production run.
Conclusion
In the realm of cosmetics, packaging is the silent ambassador of your brand. By leveraging cosmetics packaging box die cut design templates equipped with 3D previews, you empower yourself to create packaging that is not only visually striking but structurally sound. The convenience of receiving EPS10, SVG, PDF, and AI formats in a single download streamlines your workflow, allowing you to focus on creativity rather than engineering.
Whether you are launching a new skincare line or rebranding an existing product, having access to files pre prepared with real dimensions gives you a significant advantage. It ensures that your vision translates accurately from screen to shelf, creating a memorable unboxing experience for your customers. Thank you for visiting my store, and we wish you great success in bringing your cosmetic creations to life.